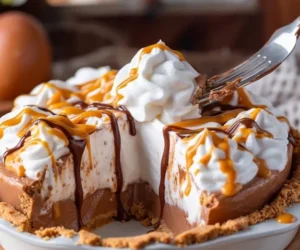
This dessert takes me right back to childhood Peanut Butter Chocolate Instant Pudding Pie
Peanut Butter Chocolate Instant Pudding Pie : where are certain desserts that instantly transport us to a simpler time, a time filled with laughter, happy memories, and the sweet smells of our mother or grandmother’s kitchen. One such dessert is the Peanut Butter Chocolate Instant Pudding Pie. Each bite of this delicious pie is not just about the taste; it’s about reliving those precious moments of childhood. The combination of creamy peanut butter and rich chocolate is like a warm embrace from the past, reminding us of carefree days spent with family.
This dessert is simple to make and requires only a few ingredients, making it perfect for anyone, whether you’re an experienced baker or someone just starting in the kitchen. From special occasions to everyday treats, this Peanut Butter Chocolate Instant Pudding Pie is sure to become a staple in your home, just as it was in mine.
Why You Will Love This Recipe
If you’re wondering why you should try this Peanut Butter Chocolate Instant Pudding Pie, let me tell you! First, it is incredibly easy to make. You don’t need to be a professional chef to whip this up. The ingredients come together in a few simple steps, allowing you to enjoy the process without feeling overwhelmed.
Second, it is a crowd-pleaser. This dessert has something for everyone. The creamy, smooth texture of the pudding combined with the rich taste of chocolate and the nutty flavor of peanut butter creates a delightful flavor explosion in your mouth. Kids and adults alike will love it!
Finally, it’s a versatile treat. Whether you’re serving it at a birthday party, holiday gathering, or just for a cozy night in, this pie fits any occasion. Plus, there are plenty of ways to customize the recipe to suit your tastes, making it easy to put your personal spin on this classic.
How to Prepare Peanut Butter Chocolate Instant Pudding Pie
Let’s dive into how to create this mouthwatering Peanut Butter Chocolate Instant Pudding Pie. Below you will find a list of ingredients and a simple step-by-step guide to prepare this delightful dessert.
Ingredients:
- 5.9 oz box instant chocolate pudding mix
- 3 cups whole milk
- 8 oz cream cheese, softened
- 1 cup peanut butter (smooth or crunchy based on your preference)
- 1 cup powdered sugar
- 1 pre-made pie crust (you can use graham cracker or traditional pie crust)
- Whipped cream (for topping)
- Chocolate shavings or peanut butter cups (for garnish, optional)
Instructions:
- Prepare the Pie Crust: If you are using a pre-made pie crust, simply set it aside. If you are making your own, bake it according to the instructions, then let it cool completely.
- Make the Peanut Butter Layer: In a medium mixing bowl, add the softened cream cheese, peanut butter, and powdered sugar. Use a hand mixer or stand mixer to beat these ingredients together until they are smooth and well combined. This will create a luscious peanut butter filling for your pie.
- Prepare the Chocolate Pudding: In another bowl, combine the instant chocolate pudding mix and whole milk. Whisk them together until the mixture thickens, usually about 2 minutes. Make sure there are no lumps.
- Assemble the Pie: Spread the peanut butter mixture evenly over the bottom of the pie crust. Then, gently pour the chocolate pudding on top of the peanut butter layer. Use a spatula to spread it evenly.
- Chill the Pie: Cover the pie with plastic wrap and refrigerate it for at least 4 hours or until it’s set. This will help the flavors meld and make the pie easier to slice.
- Serve: Before serving, top the pie with whipped cream. You can also add chocolate shavings or chopped peanut butter cups for an extra special touch.
How to Serve Peanut Butter Chocolate Instant Pudding Pie
When it comes to serving this delicious dessert, presentation is key! Here are some ideas on how to serve your Peanut Butter Chocolate Instant Pudding Pie:
- Slice it Up: Use a sharp knife to cut into slices. Serve each slice on a plate and drizzle some chocolate syrup for added flair.
- Accompany with Ice Cream: Offer a scoop of vanilla or chocolate ice cream on the side. The contrast of warm ice cream with the chilled pie is simply divine!
- Customize Each Serving: Allow guests to customize their slices. Set up a toppings bar with crushed peanuts, chocolate drizzle, and extra whipped cream for everyone to enjoy.
How to Store Peanut Butter Chocolate Instant Pudding Pie
If you have leftovers (which can be a lovely treat for later), here’s how to store your pie:
- In the Refrigerator: Cover the pie securely with plastic wrap or aluminum foil. Store it in the refrigerator for up to 3-5 days. This allows the flavors to continue mingling while keeping it fresh.
- Freezing the Pie: If you want to store it for a longer period, you can freeze the pie. Wrap it tightly in plastic wrap, then in aluminum foil. It can last in the freezer for up to 2 months. When you’re ready to eat it, let it thaw in the refrigerator overnight before serving.
Tips for Preparing Peanut Butter Chocolate Instant Pudding Pie
- Ingredient Temperature: Make sure your cream cheese is softened at room temperature before mixing. This will help achieve a creamy, smooth texture without lumps.
- Whipping the Cream: If you decide to make fresh whipped cream, make sure your mixing bowl and beaters are cold. This helps the cream whip faster and more effectively.
- Chill Time: Allow the pie to chill for at least four hours. This not only helps with setting but also allows the flavors to blend beautifully.
- Decorations: Get creative with toppings! Use crushed nuts, chocolate chips, or sprinkles to add a personal touch.
- Taste Test: Before filling the pie, taste your peanut butter filling and chocolate pudding. If you prefer one flavor more, feel free to adjust the ingredients slightly.
Variations
While the Peanut Butter Chocolate Instant Pudding Pie is delightful on its own, don’t hesitate to experiment! Here are a few variations you might want to try:
- Nut-Free Option: If you have nut allergies, you can replace peanut butter with sunflower seed butter or a creamy vanilla pudding layer for something different.
- Change the Flavor: Instead of chocolate pudding, consider using vanilla pudding for a lighter flavor. You can also add chocolate chips to the peanut butter layer for a twist.
- Additional Layers: Consider adding a layer of banana slices on top of the peanut butter filling for extra flavor and texture. Alternatively, create a layer of crushed cookies or Oreos for added crunch.
Frequently Asked Questions
1. Can I make this pie in advance?
Yes! The Peanut Butter Chocolate Instant Pudding Pie can be made a day ahead of time. Just ensure it’s adequately covered and stored in the refrigerator before serving.
2. Can I use a homemade pie crust?
Absolutely! If you prefer to make your own pie crust, feel free to do so. Just ensure to bake it completely and let it cool before adding the fillings.
3. What can I use instead of the pie crust?
If you want a gluten-free option, consider using crushed gluten-free cookies mixed with melted butter as the base. Press it into the pie dish the same way you would a traditional crust.
4. Is there an alternative to instant pudding mix?
You can make a homemade chocolate pudding instead of using instant pudding mix. Just be sure to cook it according to the recipe, then let it cool before assembling the pie.
5. How can I make the pie lighter?
To lighten the recipe, use low-fat cream cheese and sugar substitutes in place of regular sugar. You can also consider using almond milk for a lighter version.
Conclusion
The Peanut Butter Chocolate Instant Pudding Pie is truly a delightful dessert that captures the essence of childhood memories. It is simple to prepare, incredibly satisfying to eat, and perfect for any occasion. Whether you share it with family, friends, or simply enjoy it on your own, this pie is sure to bring a smile to everyone’s face.
So gather your ingredients, follow the instructions above, and treat yourself to this nostalgic dessert that takes you right back to childhood!