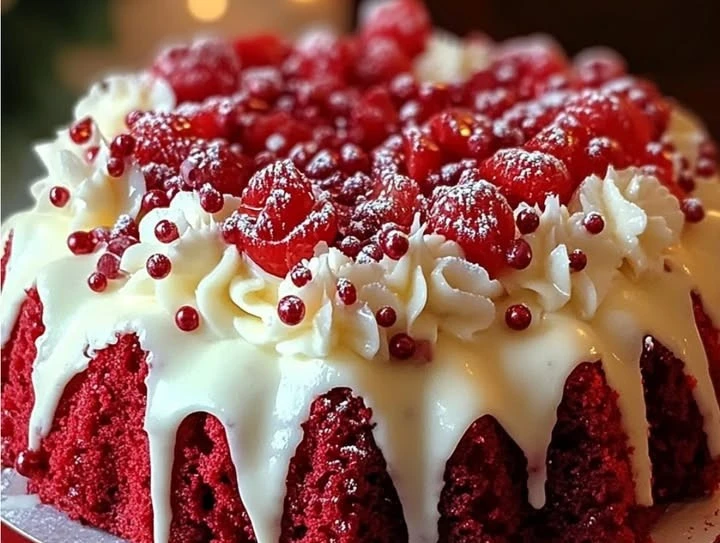
Christmas Red Velvet Poke Cake 🎄🎂
Christmas Red Velvet Poke Cake 🎄🎂 : christmas is a magical time filled with joy, laughter, and delicious food. One of the best ways to celebrate this festive season is with a delightful dessert that can impress your family and friends. The Christmas Red Velvet Poke Cake is just that! This cake not only looks stunning with its vibrant red color but also tastes amazing with every bite. It has a rich, soft texture and a burst of flavors that will make it a hit at your holiday gatherings.
In this article, we will walk you through why you will love this recipe, how to prepare it, and some helpful tips to make the perfect Christmas Red Velvet Poke Cake. So grab your apron, and let’s get baking!
Why You Will Love This Recipe
This Christmas Red Velvet Poke Cake is perfect for the holiday season for several reasons. First, it has a rich red velvet base that is both visually appealing and delicious. The deep red color not only gives it a festive look but also pairs beautifully with its creamy fillings and fluffy frostings.
Second, this recipe is surprisingly easy to make! Even if you are a beginner baker, you can create this show-stopping dessert with simple ingredients and straightforward steps. You gather the ingredients, make the cake, poke holes in it, fill it with a delightful mixture, and top it off with a luscious frosting.
Third, the combination of textures and flavors in this cake is simply irresistible. The contrast between the moist cake, creamy filling, and light frosting creates a delightful experience with every bite. Every person who takes a slice will be asking for seconds!
Finally, this cake is highly adaptable. You can change its flavor, add different toppings, or even create variations to fit your personal taste. This allows you to make it truly your own and to impress your guests time and again.
How to Prepare Christmas Red Velvet Poke Cake
Preparing your Christmas Red Velvet Poke Cake is a fun and straightforward process. Before you get started, make sure to gather all your ingredients and tools. Here’s a breakdown of what you will need.
Ingredients:
- 1 box of red velvet cake mix (or homemade red velvet cake)
- 3 large eggs
- 1 cup of vegetable oil
- 1 cup of water
- 1 can (14 ounces) sweetened condensed milk
- 1 cup of white chocolate chips
- 8 ounces cream cheese, softened
- 1 cup powdered sugar
- 1 cup heavy whipping cream
- 1 teaspoon vanilla extract
- Red and green sprinkles for decoration (optional)
Instructions:
- Prepare the Cake Batter:
- Preheat your oven to 350°F (175°C). Grease a 9×13 inch baking dish.
- In a large bowl, combine the red velvet cake mix, eggs, vegetable oil, and water. Mix until smooth.
- Bake the Cake:
- Pour the cake batter into the prepared baking dish, spreading it evenly.
- Bake for 30–35 minutes, or until a toothpick inserted into the center comes out clean.
- Allow the cake to cool in the pan for about 15 minutes before transferring it to a wire rack to cool completely.
- Poke Holes in the Cake:
- Once the cake has cooled, use the end of a wooden spoon or a straw to poke holes all over the top of the cake. Be sure to poke holes about an inch apart.
- Prepare the Filling:
- In a small saucepan, heat the sweetened condensed milk over low heat. Stir in the white chocolate chips until melted and smooth.
- Pour the warm mixture over the poked holes in the cooled cake, allowing it to soak in.
- Make the Cream Cheese Frosting:
- In a medium bowl, beat the softened cream cheese until creamy.
- Gradually add in the powdered sugar and vanilla extract. Mix until smooth.
- In another bowl, whip the heavy cream until soft peaks form. Carefully fold the whipped cream into the cream cheese mixture.
- Frost the Cake:
- Spread the cream cheese frosting over the top of the cake.
- Sprinkle with red and green sprinkles if desired.
- Chill and Serve:
- Refrigerate the cake for at least 2 hours before serving. This allows the flavors to meld together.
How to Serve Christmas Red Velvet Poke Cake
When it comes to serving your Christmas Red Velvet Poke Cake, presentation is key. Cut the cake into squares and use a spatula to lift each piece onto dessert plates. You can add extra cream cheese frosting on the side, or drizzle a little chocolate syrup for an added touch.
If you’re serving during a holiday party, consider decorating the cake with fresh berries or edible glitter to enhance its festive appearance. You can also serve it with a scoop of vanilla ice cream for a delightful treat.
Compliment each serving with steaming cups of hot cocoa or a warm spiced cider to keep the holiday cheer alive!
How to Store Christmas Red Velvet Poke Cake
To keep your delicious cake fresh, store any leftovers in an airtight container in the refrigerator. The cake can stay fresh for up to 4-5 days. The flavors will continue to deepen as it sits, making it even more delightful when you go back for seconds!
If you’d like to prepare the cake ahead of time, you can bake it and poke the holes, but wait to add the filling and frosting until the day you plan to serve it. This way, the cake will remain moist and the frosting will stay fluffy.
Tips for Preparing Christmas Red Velvet Poke Cake
- Use Room Temperature Ingredients: Make sure your eggs and cream cheese are at room temperature to ensure they mix together smoothly.
- Don’t Overmix: When making the cake batter, mix until just combined. Overmixing can lead to a tougher cake.
- Poke Holes Generously: Poke holes deep enough so the filling can soak in well, but not so deep that the cake falls apart.
- Chill the Cake: Letting the cake chill for a few hours allows all the flavors to meld beautifully, making it tastier.
- Add Special Decorations: Sprinkles, whipped cream, or seasonal fruits like pomegranate seeds can make your cake look extra festive.
Variation
While the classic Christmas Red Velvet Poke Cake is delightful, there are endless possibilities for variations. Here are a few ideas:
- Mint Chocolate Variation: Add peppermint extract to the cream cheese frosting, and sprinkle crushed candy canes on top for a minty twist.
- Coconut Cream Poke Cake: Replace the white chocolate filling with coconut cream, and top with toasted coconut flakes for a tropical vibe.
- Chocolate Ganache Drizzle: After frosting, top the cake with a warm chocolate ganache drizzle for a rich chocolatey flavor.
Frequently Asked Questions
1. Can I Use a Homemade Red Velvet Cake Recipe?
Yes! If you prefer homemade cakes, you can definitely use your favorite red velvet cake recipe instead of the boxed mix. Just be sure to bake it in the same dimensions noted in the recipe.
2. Is it necessary to chill the cake before serving?
Yes, chilling the cake allows the flavors to meld beautifully and gives the filling a chance to set, which improves the overall taste and texture.
3. Can I freeze the Christmas Red Velvet Poke Cake?
Yes, you can freeze the cake! However, it’s best to freeze it before adding the frosting. Wrap the cake tightly in plastic wrap and place it in a freezer-safe container. When you’re ready to enjoy it, thaw it in the refrigerator before adding the frosting and serving.
4. What can I do if my cake is too dense?
If you find that your cake is denser than expected, it may have been overmixed or baked for too long. Be sure to follow the mixing directions carefully and check for doneness with a toothpick to avoid overbaking.
5. How can I make this cake gluten-free?
To make a gluten-free version, substitute the regular cake mix with a gluten-free cake mix. Be sure to check that the other ingredients, like the frosting and any fillings, are also gluten-free.
In conclusion, the Christmas Red Velvet Poke Cake is an enchanting treat that’s easy to prepare and unforgettable to taste. The festive appearance combined with rich flavors make it an excellent choice for any holiday celebration. Follow the instructions, and you’ll surely impress your family and friends with this delicious dessert! Happy baking!