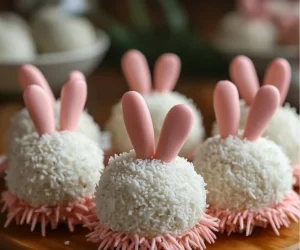
Adorable Bunny Butttttt Oreo Balls
Adorable Bunny Butttttt Oreo Balls : easter is a time for joy, celebration, and, of course, delightful treats! One of the cutest and most flavorful desserts you can whip up for the holiday are the Adorable Bunny Butttttt Oreo Balls. These little delights are not only fun to make, but they also bring a nostalgic taste of Easter egg hunts and springtime joy. They are simple to prepare, and the result is a sweet, creamy snack that will bring smiles to everyone’s faces. Whether you are celebrating with family, friends, or simply want to enjoy a festive treat at home, these Oreo balls are sure to impress.
Why You Will Love This Recipe
You will love this recipe for many reasons. First, it is incredibly easy to make, even for those with little baking experience. With just a few simple ingredients, you can create something that looks and tastes amazing. The Oreo cookies provide a rich chocolate flavor, while the cream cheese adds a creamy texture that complements the sweetness perfectly.
Moreover, these little bunny balls are super versatile. You can customize them in various ways, making them suitable for any gathering or occasion. Plus, they are visually appealing! With a little creativity, you can transform them into adorable bunny shapes that are perfect for Easter celebrations. They also make fantastic gifts for friends and family, wrapped up in cute boxes or bags.
Finally, they are no-bake, which means you can spend less time in the kitchen and more time enjoying the festivities! Simply mix the ingredients, shape them, and chill. It really is that easy!
How to Prepare Adorable Bunny Butttttt Oreo Balls
Now that you are excited about these yummy treats, let’s dive into how to prepare them. Making Adorable Bunny Butttttt Oreo Balls is a fun and straightforward process. Just follow these simple steps, and you’ll have these delicious bites ready in no time!
Ingredients:
To make your Adorable Bunny Butttttt Oreo Balls, you will need the following ingredients:
- 36 Oreo cookies (classic, not double-stuffed)
- 8 oz cream cheese, softened
- White chocolate or candy melts (for coating)
- Mini chocolate chips (for eyes)
- Pink candy melts or pink gel icing (for noses)
- Cotton candy or shredded coconut (for bunny tails)
Instructions:
Follow these steps to make your Oreo balls:
- Crush the Oreos: Start by placing the Oreo cookies in a food processor. Pulse the cookies until they are finely crushed. If you do not have a food processor, you can also place the cookies in a zip-top bag and crush them with a rolling pin.
- Mix with Cream Cheese: In a large mixing bowl, combine the crushed Oreos with the softened cream cheese. Mix well until fully combined. The mixture should be thick and hold together.
- Shape into Balls: Using your hands, scoop out a small amount of the mixture and roll it into a ball about 1 inch in diameter. Place the balls on a baking sheet lined with parchment paper.
- Chill: Once you have rolled all the mixture into balls, place the baking sheet in the fridge. Let the Oreo balls chill for about 30 minutes. This helps them firm up and makes them easier to coat.
- Melt the Chocolate: While the balls are chilling, melt the white chocolate or candy melts in a microwave-safe bowl. Heat in 30-second intervals, stirring in between, until smooth and fully melted.
- Coat the Oreo Balls: Once the Oreo balls are firm, remove them from the fridge. Dip each ball into the melted white chocolate, making sure to coat it evenly. Use a fork to lift the ball out of the chocolate and tap it gently on the edge of the bowl to remove excess chocolate.
- Decorate: While the coating is still wet, place two mini chocolate chips on each ball for eyes. Then, using pink candy melts or gel icing, add a small dot for the nose. Finally, if desired, roll the bottom of each ball in cotton candy or shredded coconut for a cute little tail.
- Let Set: Place the decorated Oreo balls back on the baking sheet and let them sit at room temperature until the chocolate hardens. You can also place them in the fridge to speed up the process.
How to Serve Adorable Bunny Butttttt Oreo Balls
Once your Adorable Bunny Butttttt Oreo Balls are set and ready, it’s time to serve them! Here are some fun ways to present your treats:
- Easter Dessert Table: Arrange the Oreo balls on a beautiful platter or cake stand surrounded by colorful Easter eggs. This will add a festive touch to your dessert table.
- Gift Treat Bags: Place some Oreo balls in clear bags tied with colorful ribbons. These make great treats to hand out to friends, family, or even neighbors.
- Party Favors: If you are hosting an Easter party, consider using the Oreo balls as party favors. Wrap them individually in cellophane, and they can double as delicious take-home gifts!
How to Store Adorable Bunny Butttttt Oreo Balls
Once you have made your Adorable Bunny Butttttt Oreo Balls, you may want to store some for later. Here’s how to do it:
- In the Fridge: Store the Oreo balls in an airtight container in the refrigerator. They can stay fresh for about 5 to 7 days.
- In the Freezer: If you want to keep them for a longer time, you can also freeze them. Place the Oreo balls in a single layer on a baking sheet and freeze until solid. Once frozen, transfer them to an airtight container or freezer bag. They can be stored in the freezer for up to 3 months.
Tips for Preparing Adorable Bunny Butttttt Oreo Balls
Here are some helpful tips to make your experience even better:
- Using Cream Cheese: Make sure that your cream cheese is at room temperature. This makes it easier to mix with the crushed Oreos.
- Crushing Oreos: If you don’t want to deal with cleaning a food processor, a sturdy zip-top bag and rolling pin are fantastic alternatives for crushing cookies!
- Melting Chocolate: Be careful not to overheat the chocolate or candy melts. Heat in small intervals and stir well to avoid burning.
- Decoration Creativity: Feel free to get creative with your decoration! Use different colors and sprinkles to make your Oreo balls look unique.
Variation (If Applicable)
If you are looking for variations to the adorable bunny theme, consider the following:
- Bunny Nests: Instead of rolling the mixture into balls, press them into a flat layer and cut them into small squares. Then, you can decorate them like nests with jelly beans!
- Different Flavors: You can experiment by adding different flavorings, such as mint extract or almond extract, to the cream cheese mixture for a unique taste.
Frequently Asked Questions
1. Can I make these Oreo balls ahead of time?
Yes! You can prepare the Oreo balls a day or two ahead of time. Just keep them stored in the refrigerator until you are ready to serve.
2. Can I use different types of chocolate for coating?
Absolutely! You can use dark chocolate, milk chocolate, or any flavor of candy melts that you prefer. Just follow the melting instructions for whichever type you choose.
3. Can I make these without cream cheese?
While cream cheese adds creaminess, you can use alternatives like frosting or even nut butter for a different taste and texture. Just make sure whatever you use holds the Oreo crumbs together.
With this detailed guide to preparing Adorable Bunny Butttttt Oreo Balls, you are now set to create an exciting treat that everyone will love. These delicious, whimsical desserts are perfect for celebrations or simply enjoying on a spring afternoon. Happy baking!